Build Days #24-27

IMG_2421Last week was a four day week because of the Bank Holiday weekend. The plumbers were here laying new pipework.

IMG_2420Pipes coming into the en suite.

IMG_2452The old toilet was removed.

IMG_2445Here you can see the pipes and valves for the new shower being cut into the wall.

IMG_2443The removal of old radiators revealed more wallpaper. This is the one that I had only previously caught small glimpses of in the en suite.

IMG_2444This house used to have lots and lots of patterns. 1920s or 30s? It makes me think that this room was a nursery.

IMG_2476On the first floor hallway there is this 1950s pattern. You can also see that at one point much of the house was painted a dark navy blue.

IMG_2477Down in the corner is yet another wallpaper – the graphics look 1960s to me.

IMG_2427The plasterers continued their work too. Here is the kitchen and future kitchen window.

IMG_2430The other side of the kitchen.

IMG_2461
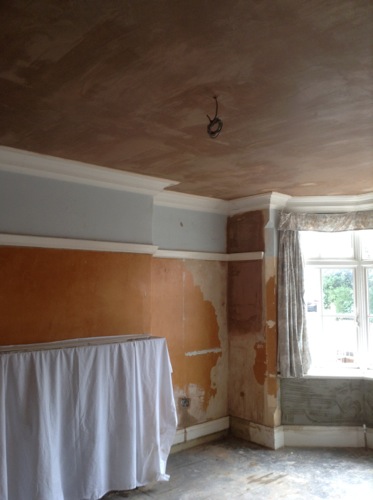
In the dining room they plastered the ceiling and did the first layer on the chimney breast and recently exposed fireplace.

IMG_2468Oliver and Ruby inspecting the work in the dining room.

IMG_2474Oliver unsure of the large bucket of plasterer’s water. Not for drinking or splashing.

IMG_2459Preparations for the repair of the large crack at the bottom of the stairs.

IMG_2431It’s all a bit messy though. That carpet will be going and the terrazzo underneath will be restored.

IMG_2423Also the scaffold began to go up. Front.

IMG_2424Side.

IMG_2466By Friday it was complete at the front of the house. Can’t wait to get up there and have a look!


Kitchen Plans

120513d1In the last post I showed you the granite that I was considering for the counter tops in the kitchen. Here are the 3D plans for the kitchen showing the layout.  The cupboard doors and some of the features will look a little different so it’s really just for the purposes of understanding where everything will go. There is a double sink by the window and the dishwasher will go in the unit to its right. The doorway pictured is the one that leads through into the breakfast room. In the corner to the left by the window will go the kettle, toaster, coffee machine etc., or possibly this will be the main preparation area – I will have to see how it feels when I get in there.

180514 alt cooker hood 3dAlong this wall there is the range cooker. There will be six large drawers for utensils, pots and pans etc. The pairs of wall mounted cupboards on either side of the range will actually be part-glazed. Instead of the stainless steel chimney extractor there will be an integrated extractor set into a mantel-type set up.

30051 mwave 3dAlong this wall is the door into the hallway, the fridge and more units including a built in microwave.

300515pantrydFinally, next to the servants’ staircase door is a built in dresser/pantry arrangement. The kitchen is too small for an island counter in the centre but when we move in I will see whether a butcher’s block or something like that will fit in the space.

43I really like this round table/island counter and I have been talking to a local cabinet maker to see whether we might be able to make something similar.

IMG_2403In this brochure picture you can see the actual doors we will be having. That’s the right colour too: ‘Mussell’. Can you see how some of the doors have glazing on the top part? We’re having that too. You can also see the mantle set up above the range cooker.

Screen Shot 2014-05-30 at 21.03.37In terms of lighting, there will be this centre ceiling pendant and then four halogen spotlights on a separate switch. There will also be LED under cabinet lighting – with remote control!


IMG_0914It’s not the biggest kitchen in the world but I think we have designed it well. Considering this is our current kitchen up here on the top floor, the new kitchen will be a dream!

The Granite Farm

IMG_2440Today my kitchen man Tony drove me to Welford in Northamptonshire to visit the granite farm. No, it’s not really a farm where they grow granite but rather a large outdoor showroom/warehouse in the countryside.

IMG_2439In the distance you can see all the slabs of granite standing on their sides. There were so many to choose from but it was great to see them in real life and up close rather than in a catalogue or online. You also get to choose your exact slab.

IMG_2432My first choice is this one here. It’s called Cosmic Black and comes in a textured matt finish called ‘leather’. It was beautiful to touch.

IMG_2433Up close you can see the different textures and colours. The lighter quartz gives the slab a real depth as it has a certain translucence. The only thing I am concerned about is how I would go rolling pastry on a textured surface. It is also slightly more expensive so I will need to wait for the entire kitchen quote to come through.

23219_274-38_KASLIMP2I do have a back-up choice, called Kashmir Lime. It’s very nice too.

Time Capsule

I am thinking about making a time capsule to build into the fabric of the house – behind a wall, under the floorboards, somewhere like that.

If anyone reading has any ideas:

What sort of receptacle should I use?

What should I include in it?

Where should I put it?

I am thinking that I may gather up all the ‘Found Objects’ and include them in the capsule as well. What do you think?

IMG_1841

The House Fights Back

IMG_2413This morning we heard series of bangs, a loud tumbling noise and a thud but couldn’t quite work out where it had come from. It sounded like it was on the stairs but also outside. I had visions of Ruby having escaped out of a window and fallen off the roof. We did a quick cat headcount and everyone was accounted for. Looking out of the window there was a large lump of wood on the ground directly outside the front door.

IMG_2412The house is fighting back, or giving up, it’s hard to decide. The dormer window on the top floor is now missing the left hand side of its casing.

IMG_2411A bit easier to see in close up. It was a good thing that no-one was at the front door when it happened. It has been windy and rainy the last couple of days but this morning it was fine and perfectly still. It confirms that there is a weak point with that dormer and that spot lines up with the leaks in the room below.

I am glad the scaffolding is going up soon so that we can fully inspect all the high parts of the house. I fear this entire dormer may need to be rebuilt. The scaffolding has been delayed because there is a lack of equipment available, which points to a recovery in the building industry. Unfortunately this means we may experience some delays as the build progresses but I am thankful that we signed up JB when we did.

Build Day #23

There was mess. And dust.

The plasterers plastered. The builders built. The labourers laboured. The electricians…wired.

I spent a couple of hours with Tony the kitchen man finalising the kitchen design. Then a couple more hours sweeping, dusting and vacuuming. The builders are very neat and tidy but they don’t vacuum. It’s a three day Bank Holiday weekend so it will be nice for us and the cats to have a bit of a break.

IMG_2404The chimney breast in the dining room has been fully stripped of plaster. You can see the pipes for the old gaslights. The ceiling in this room was over boarded today too.

Build Day #22

IMG_2331The removal of the ceiling in Mark’s future study means that we can now see exactly where the leaks are coming from. It also means that the leaks are no longer absorbed by the plaster and water drips straight into the room.

IMG_2330Evidence of another leak in the future en suite. Both rooms leak due to the dormer windows on the floors above. The windows will be repaired soon and so too will the leaks.

IMG_2334Plastering continues. I have decided that one never knows true mess in a home renovation until the plasterers arrive. They bring dust, mud and debris but their work really marks a transition as you can see the new house taking shape.

IMG_2335The other wall in the bathroom has been boarded up ready for plastering.

IMG_2378Plasterer’s buckets.

IMG_2347Plasterer’s platforms. And Ruby.

IMG_2341

The repaired bay in the master bedroom.

IMG_2339And the new ceiling!

IMG_2358The blocked up door to the future en suite.

IMG_2351It is the lounge’s turn to be stuffed with furniture while the dining room is plastered.

IMG_2354Ruby, queen of new box towers.

IMG_2389Oliver inspecting the first floor hallway. Everywhere you look there is mess and dust. For the first time I haven’t even bothered to try and vacuum as there will only be more tomorrow.

IMG_2355Rosie on the stairs. Could she be any more beautiful?

IMG_2344In the back the breakfast room is taking shape with the boarding almost complete.

IMG_2343Facing towards the kitchen.

IMG_2342And turning a little further to the right.

IMG_2360A new bucket installed in Mark’s future study to catch the drips.

IMG_2365Rosie on the bed. At the end of the day this bed is re-made, a bedside table dusted off and a rug unrolled on the floor. You’d never know it wasn’t the Ritz in the dark. Plus there’s no electricity on this floor so bedtime involves torches and a mobile phone as an alarm clock.

IMG_2400See? Rosie making herself comfortable in her glamorous surroundings. About to be ambushed by her sister.

IMG_2401And they’re off!


Build Day #21

IMG_2298Today the master bedroom was cleared out, ceilings were boarded over and the plasterers began.

IMG_2299Here you can see repairs to the old plaster where it was water damaged. The first layer is the base coat.

IMG_2304The door from the bedroom to the future en suite was finally reinstated. This is the first time that anyone has seen through this door at least fifty years.

IMG_2306In the en suite the door that leads to the hallway has been blocked up. There will be a shower in this corner soon.

IMG_2307The view back into the bedroom. I now have my eye on that blocked up fireplace…it may be time for a reveal while the room is empty and messy.

IMG_2312The newly blocked up door as seen from the hallway..

IMG_2313In the lounge the plasterers have skimmed the ceiling and patched the walls. Mark asked why the ceiling was brown – that is the colour of setting plaster as the plaster is clay based.

IMG_2315We are fortunate that the cornices are so deep. It means we haven’t lost a lot of it with the overboarding and plastering.

IMG_2322At the back of the house the Celotex insulation and boarding continued. It’s starting to look more like a room now.

IMG_2327Even the little cupboard under the servant’s staircase has been given the insulation treatment.

IMG_2328Also the ceiling of the former pantry.

IMG_2320In the coal store the electricians did some future-proofing ready for Stage 2.


Build Day #20

IMG_2280The ceilings that had started to go up in the kitchen were taken back down again as the electricians needed access. Luckily only a few of the boards had been fitted.

IMG_2281Entire rooms were emptied of our stored boxes and furniture and the lounge got its new ceiling boards, which will be plastered over tomorrow.

IMG_2279This left other rooms bulging with our stuff!

IMG_2277In Mark’s future study the collapsing leaky ceiling was brought down and when JB investigated, it appears that we have some wet rot, with a fruiting body. Sounds delightful. If you look carefully through the ceiling into the shadows you can see an irregular line of white fungus. This will be treated when the window on the floor above is removed and the source of the moisture is stopped. At least wet rot isn’t as bad as dry rot, apparently.

IMG_2275The old radiator from the hallway was taken off the wall in preparation for its restoration. Written on the back in chalk are some of the original delivery notes. The name is Mr J Paris but no-one by that name has ever owned this house, so either this was the name of the installer or perhaps a tenant, though I doubt a tenant would be paying for the installation of heating. We think the radiator dates to the 1930s. I want to have it resprayed in a metallic paint called Old Penny Bronze as a feature in the entrance hall.

IMG_2283Behind the radiator was a magnificent wallpaper.

IMG_2284It features birds in foliage.

IMG_2285And birds in gilded cages. It’s a pale blue grey with yellow.

IMG_2286There was also evidence of another wallpaper on the left featuring stylised leaves and flowers. It appears to have been applied after the radiator was in place as it doesn’t reach fully behind it.

IMG_2288Then on the right hand side was this paper featuring stripes and grapevines.

IMG_2290The lining of the breakfast room continued.

IMG_2289Services were piped in for the future Stage 2 build in the coal store – hot and cold water and the heating pipes. We will also have an electric feed put in.


Found Objects #8

IMG_2193Found in the spooky eaves cupboard. A small tourist quality pendant of a pope raising his hand in benediction. Appears to have been enameled or painted in the past.

IMG_2194On the back, a single flower and the word Italy.

Can anyone identify which Pope (or is it a saint?), given the flower symbol and image on the front? Not my area, I’m afraid.