The Upcycling of the Japanese Chest

You may recall my earlier post about the Japanese chest.

10485141_896027663843156_4785788596124509856_nIt has now been up-cycled by my friend Claire and it looks fabulous!

Screen Shot 2016-02-25 at 19.48.01I always thought you could do something with it but I didn’t have the time or skill-set. I’m tempted to buy it. I need something to store the Christmas tree in…

The Return of the Japanese Chest…or is that the Phantom Japanese Chest…

Or The Japanese Chest Awakens? With apologies to George Lucas. In truth though, there are only three Star Wars films and they ended when I was eleven years old. So there.

IMG_8473Today I went down the street to visit my friend Claire who owns the local antiques/vintage shop called The Vintage Fox, where I previously bought this. What should I find on the pavement but the Japanese chest that had spent nearly sixty years in The Edwardian House!

You can see my post about the chest here.

IMG_8474I knew I should have held onto it! Claire said she bought it from a man who occasionally drops by to offload the odd piece. I had thrown the chest into our skip when we were starting Stage Two of the renovation in April/May this year and six months later it turns up here! As I laughingly told Claire, my builder used to refer to these individuals as ‘skip rats’.

Stage 2, Day 21

IMG_2153

The start of week five. The first job is to get the cats out of bed and into the other part of the house. The breakfast room is their room really. That’s Oliver yawning at the top of the cat tree. Ruby is below and Rosie has taken to the crate lately.

IMG_2168

The tiler was here and he laid the floor tiles in the top floor bathroom. They’re great looking tiles but they don’t go with that current wall colour so I will have to think about what to do – perhaps just white walls.

IMG_2170

Most of the wall tiles were fixed too.

IMG_2173

He has stopped at the bottom as he needs the shower tray fitted to finish off here.

IMG_2174The new shower has arrived: much larger.

IMG_2159

Carpentry work also began today. The guest room window got a new sill.

IMG_2163Frame and architrave fitted.

IMG_2166

The creepy top floor cupboard, hereafter known as the ‘top floor cupboard’ (or perhaps ‘walk-in linen press’?) had its door reversed. The door used to open inwards and the top corner dug a big hole in the sloping ceiling. It was also difficult to negotiate your way around the open door to get to the left hand side of the cupboard.

IMG_2167

There’s much more room in there because of this change too, though you could potentially push someone down the stairs if you flung the door open quickly.

IMG_2164

The cupboard also got some skirting boards.

IMG_2165Very nice. It just needs decorating now.

IMG_2156

Downstairs the skirtings were refitted where we had the damp treated.

IMG_2155

Work was done preparing some of the old doors that are going into new spaces. Here the old pantry and kitchen doors were prepared for their new lives as the utilty and the toilet door. The pantry door will only have moved about a metre from its original location, though for all of last year it was on the top floor as the ‘front door’ to our flat.

IMG_2176

The old understairs door has been split in two to make a pair of doors to go in its original opening. This will mean I can fit shelves into the future walk-in pantry and divide off the space under the stairs where the gas and electricity meters are.

IMG_2179Ruby, Queen of the Stairs.

IMG_2064From the find on the weekend, full size images again so you can click and read.

IMG_2110Reminds me of the scene from Fawlty Towers when there’s sugar in the salt cellar: “I’ve put it all over the plaice”/”All over the place? What have gone and done that for?”

IMG_2079Copper AND aluminium – unlikely to be dishwasher safe.

IMG_2092

And an article written by Roger Moore, TV’s The Saint.

IMG_2112

IMG_2113

IMG_2115

The Weekend

IMG_2017The plaster in the utility is drying nicely.IMG_2014Rose is really into following light patterns on walls at the moment. On Saturday the ply was screwed down, as you can see, ready for Monday’s tiling.

IMG_2018
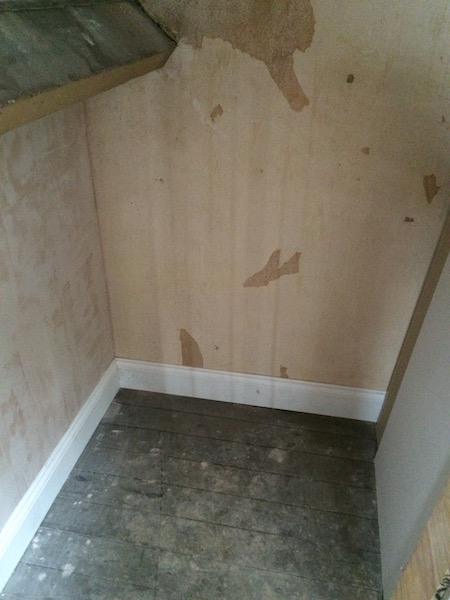
I turned my attention to the servant’s quarters as this needs to be a functioning guest room by the end of this month.

IMG_2027I cleared all the junk out ready for the decorators. The problem is that at the moment all of our storage spaces have to be empty – the creepy top floor cupboard, the top floor front bedroom, under the stairs etc. so there are great mountains of stuff piled up in all of the ‘finished’ rooms – the dining room, lounge, breakfast room, my study, hallways and other bedrooms. I went up and down the stairs a great deal, trying to at least get things on the actual floor where they will eventually be stored.

IMG_2035The guest bedroom window is about to get boxed in, given a new sill, and the original architrave will be refitted.

IMG_2029

Looking out onto the back stairs landing and through to the main part of the house.

IMG_2031The first fireplace I revealed in the house.

IMG_2044I then did some tidying up in the top front bedroom, the one with our Ed Miliband kitchen (the second/spare kitchen where you hold the press call to appear more modest). I carried a lot of junk out of this room too as the floorboards need to be repaired. I also hauled the old carpet down three floors to the skip. This room will be Mark’s study and he will be able to make tea and coffee without having to go all the way down to the kitchen. This is where we lived for the first year in this house – this room was our kitchen, dining room, lounge, my study and the cats’ room.

IMG_2042Having spent most of the day carting things around the house, I thought I’d treat myself to investgating something I have had my eye on since we moved in. That fireplace.

IMG_2041

I cut around the edges of the panel and pulled it away.

IMG_2045This is what I found.

IMG_2046The original fittings thankfully left in the fireplace, as well as some scrunched up newspaper. I love this part.

IMG_2057The fireplace was blocked up over fifty years ago just before the winter of 1964/5. That means the Fraser family lived here at the time.

IMG_2050This picture makes it all look very neat and clean but I can assure you that there was a whole lot of mess before this. That black plastic bag is full of soot, debris, masonry and one mummified bird. I held a little memorial service for him at the skip, poor thing.

IMG_2120All cleared out.

IMG_2131Looking up the chimney –  I will insert a chimney ballon to stop the draughts.

IMG_2137The fireplace is exquisite.

IMG_2123And complete. The fire bars.

IMG_2124Ash pan cover.

IMG_2126Baffle.

IMG_2127Hood.

IMG_2133Reassambled. I am so glad the fittings were left inside as they could have just as easily been thrown away, which is what usually happened.

IMG_2134Beautiful.

IMG_2135It transforms the room.

IMG_2055Now for a good look through the papers. I loved this Martian-inspired advert for Nystop stockings.

IMG_2085Someone had also tossed a note with directions into the fire grate. Trying to work out who they were and where they were going. At the bottom of the map it says Friends House – so it may have belonged to a member of the Rutherford family, who were Quakers.

IMG_2065There was also a 1964 TV magazine called TVWorld. Shirley Bassey sings Goldfinger at 5:50. These images are full size so you can click on them to have a closer look.

IMG_2077For you, iODyne.

IMG_2078A double page spread.

IMG_2071It was a very gay time in the 60s. Takes me back to my Newnes Home Management days.

IMG_2093

IMG_2074

IMG_2082The 60s – gaiety and musclemen galore. Anthony “Muscles” Holland and his “twitching to music” act.

IMG_2101The decade of sci-fi schlock.

IMG_2116And the TVWorld Dance Along programme.

IMG_2117What would your first choice be? I’d probably go with Cilla. Or the Gay Gordons.

Stage 2, Day 12

A great deal has been happening today.

IMG_1635Rosie started the morning with some stretches. It’s important to be limber.

IMG_1639Ruby and Oliver were on the lookout.

IMG_1687

B the electrician came and completed the first fix of the utility room and toilet.

IMG_1686

Switches.

IMG_1688

Sockets.

IMG_1684

Isolators.

IMG_1685

Lights. I have decided to go with wall lights in both rooms as the ceilings are so high.

1337170439-29851800

This is the “fisherman’s” light fitting I am using in the utility room. It matches the pendant in the breakfast room.

1336208283-85825000

In the toilet I am having this Tiffany style light above the basin and mirror.

IMG_1689

A and R continued work on the wall.

IMG_1690The time capsule is down in behind this brickwork now.

IMG_1681The space is quickly being enclosed.

IMG_1682Toilet taking shape.

IMG_1679The tiles for the top floor bathroom were delivered; a nice travertine-effect ceramic tile.

IMG_1640

The tree stumps in the front garden were ground down. Before.

IMG_1642During.

IMG_1643

The grinder exposed a line of red bricks that had been enveloped by the tree trunk. It wasn’t good for his cutting blades, apparently.

IMG_1659

And after. We can now walk straight to the front door from the footpath! The stump of the yew tree that was next to the front door was also ground out.


IMG_1628

I continued preparations in the guest bedroom clearing things out and tackling the fireplace.

IMG_1663

There was still a certain amount of debris falling into this fireplace that I revealed last year so I donned my mask and gloves and set about trying to sweep the chimney out. It was an extremely dusty job. I ended up just having the vacuum cleaner running a metre or so away just to try to suck up some of the airborne dust. As I swept more and more of the debris out I was reaching my arm further and further up into the chimney. Given my past experiences I expected to come accross a bird skelton or two. On the ledge I felt a large piece of loose metal and pulled it out, bringing a load of debris with it. It was the bars for the front of the fireplace! As I continued there was more.

IMG_1664

The ash pan cover.

IMG_1666

And finally the baffle – the thing you use to close off the chimney (I know these words because I just looked them up). Whoever had boarded up this fireplace was thoughful enough to leave all the fireplace parts up the chimney. Thank you person-from-the-past!

IMG_1676

It certainly saves me a few trips to reclamation yards to find replacements.

IMG_1677I still need to strip it the and have it repainted but I am so happy that I found the original fireplace parts.

IMG_1671

I looked up the chimney, which now seems fairly clear (this photo was taken before I did a final sweep – you can see more debris on the ledge). I replaced the baffle, effectively blocking the room from draughts and future debris.

IMG_1678My bucket was full – this is in addition to the foot of debris that I cleared out the last time! It’s a mixture of soot, masonry and a lot of old bird droppings – the pigeons still love to hang out on top of the chimney pot, Rosie watches them every morning from my study window. The content of the bucket was probably 50% phosphate – I could give Nauru a run for their money.


Build Day #86

IMG_4098

Oliver and Ruby, and water.

IMG_4101Miss Rose does not like getting her fur wet.

IMG_4075The old header water tank was removed from the creepy under eaves cupboard, along with the woordwormy boards (the woodworm was historic but we had it treated anyway).

IMG_4079It’s actually quite a big space. We are wondering if it was room for habitation originally. It has a window.

IMG_4077It was wallpapered.

IMG_4078There was a gaslight. Perhaps it was for a servant to sleep in?

IMG_4091The header tank was set in a large wooden box that was filled with crumbled cork and screwed up newspaper, my guess for insulation. The newspapers (The Daily Express) dated from November and December 1928.

IMG_4104The final ceiling rose was fitted in the lounge.

IMG_4103In the dining room the final pieces of concrete were chipped out of the fireplace. I have to decide what to do here – whether to have it filled with a self leveling latex filler or wait and lay more tiles, either matching or replacing the current hearth tiles.

IMG_4107Outside the next layer of the scaffold has come down. The painters are the last to finish on each level before it is removed. Gleaming paintwork.

IMG_4108Full skip. I have lost count – six?

IMG_4102Argh! Filler, on top of a light fitting, on top of a painted ceiling! It’s annoying when things are done backwards but it will be alright in the end.


Build Day #71

IMG_3627Repaired floor in the first floor hallway.

allandaleroadec1962After I uploaded my last post I found a picture of Allandale Road from 1962. You can see Hampshires bakery on the left. IMG_2797 - 2013-06-11 at 17-49-34The shop is now Brown’s Tea Rooms – where Mark and I had afternoon tea today! (I took this photo last year, when Browns was called Lockwoods – the shop with the pale green front).  The next business along is Anatolia, the Turkish restaurant. Interestingly, the following building along appeared to be a private home in the 1962 photo. Today the bay window, door and garden are gone and it is the shop where I bought our bathroom tiles (now called Pasha Design).

IMG_3622Just for reference, here is the Hampshires paper bag found under the floorboards today – electrician’s lunch 1960 is my guess.


Found Objects #9

IMG_3612

Today A the carpenter was laying new ply in the first floor hallway to replace all the broken floorboards. There was a lot of debris – broken plaster, old wiring, wood scraps. Yet another empty cigarette packet: Player’s No. 6.

IMG_3613An early type of two pin 5amp triple adaptor. UK Patent No 325130.

IMG_3615

I looked it up and the patent is dated 13 February 1930. This adds to my theory that Martha Baxter was the early moderniser of the house.

IMG_3618An early wooden electricity socket.

IMG_3616

A light switch.

IMG_3617The back plate is made of Bakelite. On the back it says “Wandsworth” and “England”.

IMG_3620The label and string that would have been wrapped around the 50 yards of GEC Vinazo Electricity Cable (‘insulated with Vulcanised India Rubber’) made in England by the Pirelli General Cable Works in Southampton. On one side the little seal says ‘Pirelli General’ and the other side ‘Southampton England’.

IMG_3621Made on Machine No 479.

IMG_3619An empty paper envelope for 3 Stanley “Yankee” Spiral Ratchet Screwdriver Bits. Made in Sheffield.

IMG_3622And something a bit more local. This is a paper bag from Hampshires Bakers and Confectioners, which must have been an old business on the nearby Allandale Road. There were also branches in Market Street and Hinkley Road. There were still crumbs in the bag. This looks post-war to me – perhaps 1950s? This would link to the second round of rewiring in the middle of last century. There are still branches of Hampshires Bakeries in Leicester but not on Allandale Road. You could probably date the bag if you knew when Hampshires (which began trading in 1900) had only these three branches. In 2009 there were 26 branches.

Interesting finds, though not as curious as the Japanese Chest or the Truth Serum


Build Days #43 and #44

Yesterday was fairly quiet. JB and a couple of his labourers arrived but couldn’t complete their job for the day as their circular saw blade had been blunted by the plumber.

IMG_2798As the quarry tiles dried there was some efflorescence of mineral salts, which is perfectly normal, apparently. They will be ‘dry scrubbed’ before they are sealed.

IMG_2810The boiler got its new home today in the airing cupboard. Looking smart. Much better that its old location.

IMG_2811The new hot water tank will go in tomorrow. It’s enormous.

IMG_2812I think these are part of the hot water system too…

IMG_2797I forgot to show you my first painted ceiling! It’s the one in the kitchen. I am very pleased with it – nice coverage.

IMG_2820I have been testing a few more colours for the dining room. I am still eyeing the red but I definitely don’t like the others.

IMG_2819P the painter started to burn off the old paint on the front door.

IMG_2813Historically blue, green and purple seem to be the predominant colours, though it probably would have been varnished originally.

IMG_2783In the understairs cupboard this magazine showed up – it may have been wedged behind the old electricity board. It is a copy of The Listener from June 22nd 1989. At first I though to myself, oh, that’s fairly recent. I then did the calculations and realised 1989 was 25 years ago! But I remember 1989 like it was yesterday! Uh oh. Must be getting old.

IMG_2800As everyone had gone home today by 3pm I decided to have another go on the scaffold. I stepped out through the bedroom window on the first floor. Here you can see the fascias and end-jacks have been stripped and painted black.

IMG_2799Most of the windows have been stripped, sanded, filled and undercoated.

IMG_2801Here is a close-up of the decorative cast iron hopper.

IMG_2803It’s not blocked here but the downpipe is full of debris about halfway down.

I then lost my nerve on the scaffold and went back inside. It’s something about being able to see down through the boards. I’ll go further next time.


Time Capsule

I am thinking about making a time capsule to build into the fabric of the house – behind a wall, under the floorboards, somewhere like that.

If anyone reading has any ideas:

What sort of receptacle should I use?

What should I include in it?

Where should I put it?

I am thinking that I may gather up all the ‘Found Objects’ and include them in the capsule as well. What do you think?

IMG_1841