Build Day #100

Well, we have reached 100 days of building!

2014-06-03 09.38.44First, Miss Rose and her adventures. Archive shot here – the top floor dormer window. A the carpenter was building the internal frame for the new window the other day when he left them open. Each day at the end of work I thoroughly check the house for open windows, doors, or any potential danger to the cats. I think that because this work was done in the ‘safe’ area for the cats on the top floor I wasn’t as vigilant as I should have been, plus I was focused on how we could re-hang the curtains to notice that the windows were open wider than usual.

IMG_4795Another archive shot. Rosie decided to explore the outdoors through that top window. My guess is that she lost her footing on the steep roof tiles and fell to the ground. It was only when I was closing the windows on the dining room ground floor that I spotted a shocked Rosie outside the doors. She was very unhappy and bleated at me through the glass. She is an indoor cat and has never, ever, been outside. She was very happy to come back in.

IMG_4895The view before she must have fallen. They don’t call them cat-slide roofs for nothing.

Photo on 12-09-2014 at 08.10Miss Rose with her grazed chin – luckily this was the only injury she sustained in her fall.

IMG_4278

On Day 100 the Great Wall was dismantled, reuniting the top floor with the rest of the house.

IMG_1657The Great Wall on the day of construction.


IMG_4280Now removed – the view from the top floor. All three cats are in this picture if you look carefully.

IMG_2698 - 2013-06-11 at 17-12-00We also moved into the new kitchen. Before shot.

IMG_4285And after.

IMG_4291I have already baked bread and cakes and prepared more fried food that I care to admit (the burners on the top floor kitchenette cooker would always cut out if they got too hot!).

IMG_4300We have also moved the cats down into their new room.

IMG_4304Cat show ribbons and the dresser.

IMG_4305Oliver and Ruby’s ribbons are on the far left. The rest belong to Rose, including her Premier medal and ribbon from the Supreme Show (the cat version of Crufts).

IMG_4302Ruby on the relocated cat tree surveying her new domain.

IMG_0840How it looked before.

IMG_4310
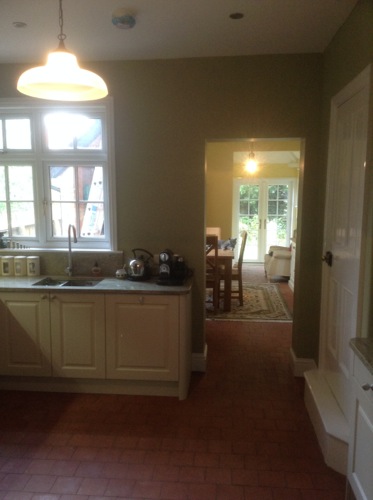
The view though the kitchen.

Screen Shot 2014-09-14 at 19.33.49A before and after shot of the breakfast room.


IMG_4313Externally, T the painter has almost finished. JB replaced the cast iron downpipe too.

IMG_4316You will also notice my colour choice for the front door – gloss black. I am very happy with it. It reinforces the Edwardian fascination with Tudor black and white architecture.


Build Day #84 and #85

Internally, the build work on the house is nearing its end. There are many small tasks that are gradually being completed: final sanding and filling, securing of loose floorboards, that sort of thing. Decoration will be done by us afterwards.

IMG_4073A ring on the master bedroom ceiling rose.

IMG_4072A casement stay on the toilet window.

IMG_4071Yet more sanding and filling…there is dust everywhere.

IMG_4070Storage cupboard fitted in the en suite. All the en suite needs now to be finished is the extractor fan fitted, some sealant around the recesses in the shower, a few paint touch ups and good clean.

IMG_4074The dehumidifiers in the kitchen and breakfast room continue to help dry out the floor.

Externally, the gutters need fitting, a window casement needs remaking, the french doors in the dining room need to be refitted etc. so that may take a little while longer.

Countdown to the rest of the furniture arriving: 11 days. Countdown to our friends M&M visiting from Australia: 36.

Build Day #81

IMG_3973Electricians installed lights and smoke detectors in the hallway.

IMG_3996Wall lights in the lounge. They don’t have their little shades on yet.

IMG_3987Toilet.

IMG_3986Another hallway light.

IMG_3988Back bedroom (former servant’s bedroom).

IMG_3989On the back landing this fitting was attached to the still wet filler – a bit of a mess really but the electricians were determined to power up whether we were ready of not. In the end they spent half the day trying to figure out a short they had created in the downstairs sockets. So in fact some of the rooms that were ready, sanded and painted still didn’t get their lights! Argh! Frustrating.

IMG_3991Downstairs cloak room now empty after the removal of the old toilet. The little pane of broken glass in the window has been removed and a replacement ordered.

IMG_3994Rosie inspecting. Thankfully the terrazzo under the toilet was undamaged.

IMG_3992Our new, single stopcock for incoming water. Much better than the four original ones!

IMG_3993I have the hooks to put back on these timber struts. I just need to apply some paint remover to the old hooks first though.

IMG_3972P the plumber connected the top floor to the main pipework and the temporary pipe was removed. Also, on the top landing the three old pipes that ran up this wall to the old expansion tank in the roof were removed. It won’t be long until the temporary Great Wall on the left is removed too so that this ceiling can be over-boarded and plastered.

IMG_3977All of the taps and pipes and toilets were commissioned. In the darkness you can see Oliver sizing up his new steam bath platform. He likes to accompany you in the bathroom when you are having a shower and needs somewhere to sit.

IMG_3979Spotting the running water in the basin for the first time.

IMG_3981These waterfall taps are great.

IMG_3984Endless fun.

IMG_4005The trouble is now the cats come to expect water on demand…

IMG_4003New rim latch and handle on the under servant stairs cupboard. Looking smart.

IMG_4002And on the servant’s stairs door.

IMG_4014New handle and mortise latch on the kitchen door.

IMG_3974Ceiling rose ring ready for fitting in the master bedroom.

IMG_3999Range cooker fitted and connected to gas and electricity. Shiny.

IMG_4039Oliver inspecting the ovens.

IMG_4015There are going to have to be some new rules enforced when the kitchen comes into use.

2014-08-15 15.22.14JB and P the plumber lighting the gas for the first time. We have fire!


IMG_4045Miss Rose. Just because.

IMG_3997Washing machine taps and outlet in the utility closet.

IMG_4047Build Day #81 was yesterday (Friday) and today there was a small amount of work done but I don’t consider today’s work a fully separate and complete build day as the trades were only here for an hour or so. The roofers were replacing roof tiles until their tile cutter broke down. T the kitchen man measured up for the glass splashback in the kitchen. The tilers came and fitted the splashbacks in the toilet…

IMG_4048…and bathroom.

IMG_4049They also repaired some of the lost grout in the kitchen and breakfast room quarry tile floors ready for Monday’s final cleaning and sealing.

IMG_4050As of Monday everyone will be barred from these two rooms while the floor is treated. Everything has been completed in here apart from the final electrical testing and the fitting of the over counter kitchen lights, both of which are low impact on the floor. Then on September 1st it will be time for us to move into these rooms!

IMG_3880

They will become the new ‘Cat Headquarters’ and we will be moving all of their things in – cat beds, cat trees, food, litter, toy box etc. The rooms will also be my new Command Central for the rest of the build.


Build Day #78

IMG_3798The dining room chandelier was installed today, after much head-scratching from the electricians. Each one of those strands of crystal had to be hooked on individually – about halfway through one of the lads realised that each strand had graduated-sized crystals and he was putting them on the wrong way around.

IMG_3834Picture lights.

IMG_3822Adjusted chain and cord on the kitchen light.

IMG_3824Cord shortened on the breakfast room fisherman’s light. Reminds me of Van Gogh’s painting The Potato Eaters.

IMG_3805Some new switches on the top floor.

IMG_3810Other wiring is yet to be completed.

IMG_3808Shower screen in the en suite. Nice.

IMG_3811Toilet, basin and heated towel rail in the WC.


IMG_3815Towel rail, basin and cabinet in the main bathroom.

IMG_3817Waterfall tap. Ruby will love it.

IMG_3802This afternoon I wondered why my water glass had splashes around it…


IMG_3825T the painter worked on the gloss paint for the trim and doors in the breakfast room and kitchen. There is a bit of a prejudice against gloss white woodwork in this country but I love it, plus it is very hard wearing, unlike the satin paint we had in our Liverpool house (and on the top floor here).

IMG_3820I had to shut the terrible trio out of the kitchen and breakfast room as Ruby was about to leap onto a window sill that had wet paint on it. She is determined to be like Pepe le Pew’s girlfriend with the white stripe on her back.

IMG_3826Maybe she wants to make Albus jealous. His 5pm vigil.


Build Day #77

IMG_3763We have a toilet!

IMG_3764And basins!

IMG_3765P the plumber was here today doing the second fix in the en suite.

IMG_3768Heated towel rail.

IMG_3766Dual basins with waterfall taps. Looking good.

IMG_3767Shower.

IMG_3771Mark really wanted a ‘rain’ shower and I wanted a normal one so I found this dual outlet shower head system.

IMG_3769Best of both worlds.

IMG_3762Oliver inspecting the glass shower screens that will be installed tomorrow.

IMG_3775In the other toilet I did an undercoat just around where the towel radiator will be installed  so that P will be able to get onto that tomorrow when I have completed the top coat.

IMG_3776Same in the bathroom.

IMG_3774Also in the toilet I removed the old casement stay and have prepared its replacement by stripping most of its paint. We will re-use the monkey tail stay that we salvaged from the upstairs window when it was removed.


IMG_3780Oliver, Ruby and Rose downstairs looking see what else has changed.

IMG_3777In the kitchen I fitted the glass shade to the light. I will need to remove a few links of the chain.

IMG_3778The light in the breakfast room is far too long and will need to be adjusted.

IMG_3782I must remember to ask if we can grout these tiles before the end of the week, as A the tile restorer will be here next week.


Build Day #75

IMG_3715Hello yellow!

IMG_3716The breakfast room is coming together quickly now. The topcoat of Farrow and Ball’s ‘Dayroom Yellow’ has been applied. It’s bright and cheery and when the sun shines you might need your sunglasses!

IMG_3713In the dining room the lining paper has been hung and the ceiling has had some undercoats.

IMG_3709P the painter discovered a spillage problem when he opened today’s paint delivery – it looks like a massacre! Farrow and Ball are sending a replacement tomorrow. The colour is called ‘Incarnadine’ – I am embracing colour in this renovation. There is a trend at the moment for cool neutrals – different shades of grey are very popular but I just don’t think they would work in our house. Plus I won’t be associated with ‘fifty shades of grey’ in any way.

IMG_3728Plastering and patching continued in the toilet.

IMG_3725And bathroom.

IMG_3719Pipes were a bit of a theme today. Pipes installed under the kitchen sink.

IMG_3720New downpipes being assembled.

IMG_3721The redundant downpipe by the coal store was removed. You can see where the door to the servant’s toilet was bricked up (now part of the breakfast room). In Stage 2 of the build (scheduled for some time next year, hopefully) this little porch area outside the coal store will be turned into the downstairs toilet.

IMG_3724The blocked downpipe at the front of the house was disassembled. You can see all the algae where it has been leaking and causing damp in the lounge room wall.

IMG_3706The downpipe was full of this black, rotting leaf litter and there were roots in the pipe at ground level. This meant that during rainfall the pipe would simply fill up and overflow. It’s why I would always hear a gurgling sound in the bedroom when it rained outside, nothing was draining through the pipe.

IMG_3704The pipe is clear now and it will be reattached when the underground pipe is cleared of tree roots (or replaced).

IMG_3722The soil stack pipe at the side of the house is ready for connection.

IMG_3718We also have a tap in the kitchen! No water yet though. Ruby is going to love drinking from that. She will probably learn how to turn it on.

IMG_3714In the en suite some of the cabinetry was fitted. It’s getting exciting now.


Build Day #74

I know that some of you come here to see the cats and that they have been missing from the last couple of posts. Sorry about that.

IMG_3690

Here’s Ruby on the kitchen bench, making it her own.

IMG_3681Ruby wanting to learn how to use the drill.

IMG_3682Ruby wanting to learn how to use the teppanyaki griddle.

IMG_3693Oliver looking worried on the landing.

IMG_3696Oliver looking handsome. And a bit worried.

IMG_3667Rosie checking out the breakfast room.

IMG_3689

The under servant stairs cupboard has been stripped ready for painting and has a new handle. OK, I need to admit it. We have decided to call in reinforcements for some of the decorating. P the painter is finishing off the breakfast room and kitchen and will also be decorating the dining room. I probably could have done it myself but it would have taken me ages, plus I’m not convinced I could paint woodwork very well.

IMG_3686The breakfast room has had a yellow based undercoat. This is not the final colour, which will be Farrow and Ball’s ‘Dayroom Yellow’, but it gives an idea of what a yellow room will look like. Bright and sunny.

IMG_3671The kitchen door has been stripped and filled.

IMG_3674The dining room floor has been covered and the walls and ceiling prepared. The walls are going to have lining paper and will be painted rather than wallpapered. I prefer paint as it is much easier to redecorate and change the colour. Not that I will ever want to change the colour that I have selected.

Once these particular rooms are decorated, and the quarry tiles in the kitchen get their final clean and seal, we will be able to get the rest of our furniture out of storage from Liverpool. We are hoping to have delivery at the end of August, which will be just over eleven months after we moved in. Not everything will be finished by then but it will mainly just be decorating work. It will be nice to have all of our stuff back under one roof even if we can’t uppack it all. Mark is of the view that if we didn’t really miss it for almost a year then it’s not incredibly essential to our lives. He is determined to downsize but we haven’t even fully upsized yet.

IMG_3700

Carpentry work continued. Skirting board where the old door into the bedroom was (now the en suite).

IMG_3678More skirtings. The kitchen is almost finished; the last parts arrive on Friday.

IMG_3675The toilet and bathroom are almost ready for their final skim.

IMG_3669

The repair to the back of the servant’s stairs cupboard was too quick for me to get a time capsule together.

IMG_3701I bought this oil painting today. It has been done by a good amateur hand and will go nicely on a wall in a room yet to be decided. It was in the charity shop for £5 so how could I pass it up? Mark asked if I bought it for the frame. I really like the painting but it is true that even the frame is worth more than £5. It is signed L H Cockerill and is called ‘Come into the garden’.


Build Day #66

IMG_3357Today the former tradesman’s entrance external door became the internal kitchen door! It needs a handle and also has to be stripped and painted.

IMG_3362Other carpentry work included the reinstatement of skirtings around the chimney breast in the dining room/

IMG_3354The dining room floor is also now ready for sanding and polishing next week.

IMG_3347Luckily JB and I had a talk about the chandelier I would be hanging in the dining room. He realised that we would need to reinforce the ceiling to take its weight, so D the carpenter lifted Mark’s study floorboards one final time before they are polished on Monday.

IMG_3363Everything’s ready now. Well, once the ceiling rose is fitted.

IMG_3349JB removed the old lath and plaster wall in the toilet and started attaching the plasterboard.

IMG_3348He said the old laths were probably chestnut wood, which is a sign of quality in the original building.

IMG_3350He also did a coating on the walls of the bathroom.

IMG_3356The electricians were here. This is the first functioning light downstairs! It is in the future utility cupboard. Unfortunately it is now the only light that works in the house – we discovered an hour ago that none of the lights on the top floor work any more. Luckily the sun doesn’t go down until late…

IMG_3346Wall lights installed in the en suite. Ignore all the marks on the wall – the paint is washable.

IMG_3345Both lights.

IMG_3358Everything was left in a big mess today so I spent an hour or so sweeping, dusting and vacuuming the house at the end of the day. I know it will get messy again but it’s nice to have everything as tidy as possible for the weekend. It also means the cats don’t wander back upstairs covered in sawdust.IMG_3360A view down the side of the house. Lots of brick dust on the path.

Build Day #64

IMG_3334Bored hole for kitchen extractor fan.

IMG_3326Bored hole for en suite extractor fan.

IMG_3338Bored hole for bathroom extractor fan.

IMG_3325Pieces of bored brick. Jokes welcome.

IMG_3329Cat and human obstacle course at the end of the day.IMG_3336The floor in Mark’s study has been repaired.

IMG_3337The floorboards in this room and the dining room are going to be stripped and polished next week.

IMG_3328Repaired toilet window architrave using reclaimed wood from elsewhere in the house.

IMG_3331The under servant stairs cupboard has its resized door attached. All the carpentry in the kitchen and breakfast room is now done.

IMG_3330The tradesman’s entrance external door begins its transformation into an internal door. Three shiny new hinges.

IMG_3335

Some external painting was also completed today but it’s hard to make out in the photo. You’ll have to trust me.


Build Days #59 and #60

Tuesday was a quiet day with no building activity.

On Wednesday the granite was installed in the kitchen! Before you look at the photos I need to tell you that last week I changed my mind on the choice of granite. As you might recall,  I was originally going to get the Black Cosmic in the leather (matt) finish. I decided, however, that the kitchen needed something lighter with a gloss finish to make the most of the light that comes into the room.

IMG_3220I decided to go with the Kashmir Lime and I am so glad that I did.

IMG_3223

The colour goes perfectly with the walls and cabinets and the greens complement the red of the quarry tile floor. There are even little red oxide hints in the granite.

IMG_3216Dresser unit for colour comparison.

IMG_3225New smaller sinks.

IMG_3239

Today JB was here doing some patching and plastering.

IMG_3235

He also checked out a water stain on the ceiling of the breakfast room – a bit hard to see in the photo. Apparently there was some spillage from old pipes when the new heating was installed, hence the stain. The good news is that there is no longer a leak and all I need to do is repaint this section of the the ceiling.

IMG_3237

My job was to continue the en suite preparation for painting of the walls and timber work.

IMG_3238

I have decided that I do not like stripping paint.