End of October?

Where has the time gone?

The decorators have finished for now as we have officially run out of money! There is carpet ordered for the master bedroom and roman blinds for the lounge but that’s it. The rest will have to wait for a little while.

IMG_4514 - 2014-10-21 at 10-14-41The exterminator came and dealt with the wasps nest in the roof of the bay window. We were willing to live and let live until a few of the wasps decided to join us in the bathroom for a shower one dark morning! They must have been attracted to the light. Plus it turns out that, although wasps never reuse the same nest, it was likely that a juvenile queen or two would have hibernated in the ceiling and set up shop next door to the old nest next year!

IMG_4528 - 2014-10-22 at 08-37-32
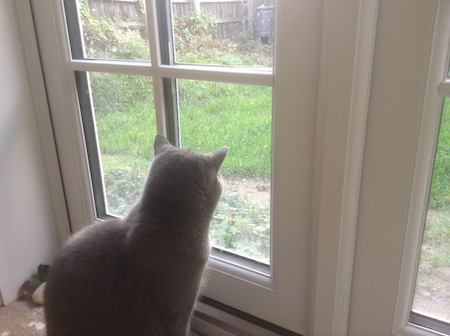
We have also had a more welcome guest in the back garden. A hedgehog has been busy building a hibernacula under a large pile of garden refuse. Ruby on the lookout.

IMG_4530 - 2014-10-22 at 12-59-33Hedgehogs are endangered so we want to do everything to make sure they are happy in our garden. While there are plenty of slugs and insects for them to eat, as the weather gets colder there will be less and less so we have bought some food to make sure they are nice and fat before they hibernate. Rosie is checking out the new food.

IMG_4587 - 2014-10-28 at 09-41-52We have bought this hedgehog feeding station for them.

IMG_4590 - 2014-10-28 at 09-43-47

Oliver has donated a spare water bowl.

IMG_4589 - 2014-10-28 at 09-42-13The hedgehog lives in the big pile behind the feeding station.

IMG_4547 - 2014-10-26 at 11-14-36Oliver has his own special source of water. You can also see that the new Silestone quartz counter tops have been fitted in the en suite.

IMG_4541 - 2014-10-26 at 11-13-19Oliver approves.

IMG_4525 - 2014-10-21 at 15-36-01
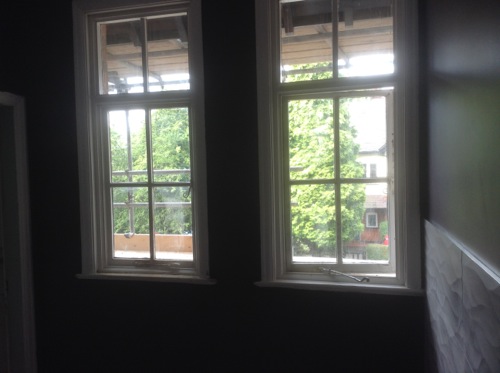
The lounge has been painted.

IMG_4524 - 2014-10-21 at 15-35-28The blinds will be fitted next week and then we will have to wait for carpet.

IMG_4518 - 2014-10-21 at 15-32-05The master bedroom has been painted and the feature wall papered. Carpet will be coming next week but we will have to wait for blinds…


Build Day #87

IMG_4134Yesterday was a public holiday but A, the floor man, was here sealing the quarry tiles. This morning it still looked a bit patchy and uneven but we are hoping that it is just the sealant still penetrating the tiles rather than anything to do with the floor not being quite dry enough to take the sealer. He will stop by to have a look at how it is going in the next few days.

IMG_4129Today I obscured the glazing on the en suite windows with a special self adhesive film. The glass was clear before as this was originally a bedroom.

IMG_4127We are also keeping an eye on this corner of the bay window as there is a wasp nest under the lead. How the roofers didn’t discover it when they were installing the new lead is beyond me. I have done some reading –  as it is late summer this nest will be well established and it’s not the best time to try to spray it. Soon the wasps will die off from the autumn cold and the nest is never re-used. In the winter I think we should block the holes where the wasps were going in. Despite my research I would still like to get the opinion of an expert.

IMG_4132The lads were her continuing to do odd jobs finishing up the inside. They managed to get dust and hand prints all over my beautifully painted dining room walls. Difficult to see in the picture. Argh!

IMG_4128The odd floorboard was replaced, this one in the creepy under eaves cupboard.

IMG_4131A box was being constructed for the incoming copper water water pipes.

IMG_4125The final skip was taken away!


Build Day #84 and #85

Internally, the build work on the house is nearing its end. There are many small tasks that are gradually being completed: final sanding and filling, securing of loose floorboards, that sort of thing. Decoration will be done by us afterwards.

IMG_4073A ring on the master bedroom ceiling rose.

IMG_4072A casement stay on the toilet window.

IMG_4071Yet more sanding and filling…there is dust everywhere.

IMG_4070Storage cupboard fitted in the en suite. All the en suite needs now to be finished is the extractor fan fitted, some sealant around the recesses in the shower, a few paint touch ups and good clean.

IMG_4074The dehumidifiers in the kitchen and breakfast room continue to help dry out the floor.

Externally, the gutters need fitting, a window casement needs remaking, the french doors in the dining room need to be refitted etc. so that may take a little while longer.

Countdown to the rest of the furniture arriving: 11 days. Countdown to our friends M&M visiting from Australia: 36.

Build Day #82

IMG_4055

Today A the floor man returned and gave the quarry tiles a final clean. Lots of equipment.

IMG_4058

Tomorrow he will install dehumidifiers to help the drying process and then next Monday the floor should be dry enough to seal.

IMG_4060

Mirrored cabinets installed in the en suite.

IMG_4062

Filling and sanding continued.

IMG_4067The broken pane of glass in the cloakroom was repaired. Now that the toilet has gone and the curtains have been removed, Ruby has discovered a new dual vantage point.

IMG_4061New glass pane also fitted in Mark’s study window.


Build Day #78

IMG_3798The dining room chandelier was installed today, after much head-scratching from the electricians. Each one of those strands of crystal had to be hooked on individually – about halfway through one of the lads realised that each strand had graduated-sized crystals and he was putting them on the wrong way around.

IMG_3834Picture lights.

IMG_3822Adjusted chain and cord on the kitchen light.

IMG_3824Cord shortened on the breakfast room fisherman’s light. Reminds me of Van Gogh’s painting The Potato Eaters.

IMG_3805Some new switches on the top floor.

IMG_3810Other wiring is yet to be completed.

IMG_3808Shower screen in the en suite. Nice.

IMG_3811Toilet, basin and heated towel rail in the WC.


IMG_3815Towel rail, basin and cabinet in the main bathroom.

IMG_3817Waterfall tap. Ruby will love it.

IMG_3802This afternoon I wondered why my water glass had splashes around it…


IMG_3825T the painter worked on the gloss paint for the trim and doors in the breakfast room and kitchen. There is a bit of a prejudice against gloss white woodwork in this country but I love it, plus it is very hard wearing, unlike the satin paint we had in our Liverpool house (and on the top floor here).

IMG_3820I had to shut the terrible trio out of the kitchen and breakfast room as Ruby was about to leap onto a window sill that had wet paint on it. She is determined to be like Pepe le Pew’s girlfriend with the white stripe on her back.

IMG_3826Maybe she wants to make Albus jealous. His 5pm vigil.


Build Day #77

IMG_3763We have a toilet!

IMG_3764And basins!

IMG_3765P the plumber was here today doing the second fix in the en suite.

IMG_3768Heated towel rail.

IMG_3766Dual basins with waterfall taps. Looking good.

IMG_3767Shower.

IMG_3771Mark really wanted a ‘rain’ shower and I wanted a normal one so I found this dual outlet shower head system.

IMG_3769Best of both worlds.

IMG_3762Oliver inspecting the glass shower screens that will be installed tomorrow.

IMG_3775In the other toilet I did an undercoat just around where the towel radiator will be installed  so that P will be able to get onto that tomorrow when I have completed the top coat.

IMG_3776Same in the bathroom.

IMG_3774Also in the toilet I removed the old casement stay and have prepared its replacement by stripping most of its paint. We will re-use the monkey tail stay that we salvaged from the upstairs window when it was removed.


IMG_3780Oliver, Ruby and Rose downstairs looking see what else has changed.

IMG_3777In the kitchen I fitted the glass shade to the light. I will need to remove a few links of the chain.

IMG_3778The light in the breakfast room is far too long and will need to be adjusted.

IMG_3782I must remember to ask if we can grout these tiles before the end of the week, as A the tile restorer will be here next week.


Build Day #75

IMG_3715Hello yellow!

IMG_3716The breakfast room is coming together quickly now. The topcoat of Farrow and Ball’s ‘Dayroom Yellow’ has been applied. It’s bright and cheery and when the sun shines you might need your sunglasses!

IMG_3713In the dining room the lining paper has been hung and the ceiling has had some undercoats.

IMG_3709P the painter discovered a spillage problem when he opened today’s paint delivery – it looks like a massacre! Farrow and Ball are sending a replacement tomorrow. The colour is called ‘Incarnadine’ – I am embracing colour in this renovation. There is a trend at the moment for cool neutrals – different shades of grey are very popular but I just don’t think they would work in our house. Plus I won’t be associated with ‘fifty shades of grey’ in any way.

IMG_3728Plastering and patching continued in the toilet.

IMG_3725And bathroom.

IMG_3719Pipes were a bit of a theme today. Pipes installed under the kitchen sink.

IMG_3720New downpipes being assembled.

IMG_3721The redundant downpipe by the coal store was removed. You can see where the door to the servant’s toilet was bricked up (now part of the breakfast room). In Stage 2 of the build (scheduled for some time next year, hopefully) this little porch area outside the coal store will be turned into the downstairs toilet.

IMG_3724The blocked downpipe at the front of the house was disassembled. You can see all the algae where it has been leaking and causing damp in the lounge room wall.

IMG_3706The downpipe was full of this black, rotting leaf litter and there were roots in the pipe at ground level. This meant that during rainfall the pipe would simply fill up and overflow. It’s why I would always hear a gurgling sound in the bedroom when it rained outside, nothing was draining through the pipe.

IMG_3704The pipe is clear now and it will be reattached when the underground pipe is cleared of tree roots (or replaced).

IMG_3722The soil stack pipe at the side of the house is ready for connection.

IMG_3718We also have a tap in the kitchen! No water yet though. Ruby is going to love drinking from that. She will probably learn how to turn it on.

IMG_3714In the en suite some of the cabinetry was fitted. It’s getting exciting now.


Build Day #66

IMG_3357Today the former tradesman’s entrance external door became the internal kitchen door! It needs a handle and also has to be stripped and painted.

IMG_3362Other carpentry work included the reinstatement of skirtings around the chimney breast in the dining room/

IMG_3354The dining room floor is also now ready for sanding and polishing next week.

IMG_3347Luckily JB and I had a talk about the chandelier I would be hanging in the dining room. He realised that we would need to reinforce the ceiling to take its weight, so D the carpenter lifted Mark’s study floorboards one final time before they are polished on Monday.

IMG_3363Everything’s ready now. Well, once the ceiling rose is fitted.

IMG_3349JB removed the old lath and plaster wall in the toilet and started attaching the plasterboard.

IMG_3348He said the old laths were probably chestnut wood, which is a sign of quality in the original building.

IMG_3350He also did a coating on the walls of the bathroom.

IMG_3356The electricians were here. This is the first functioning light downstairs! It is in the future utility cupboard. Unfortunately it is now the only light that works in the house – we discovered an hour ago that none of the lights on the top floor work any more. Luckily the sun doesn’t go down until late…

IMG_3346Wall lights installed in the en suite. Ignore all the marks on the wall – the paint is washable.

IMG_3345Both lights.

IMG_3358Everything was left in a big mess today so I spent an hour or so sweeping, dusting and vacuuming the house at the end of the day. I know it will get messy again but it’s nice to have everything as tidy as possible for the weekend. It also means the cats don’t wander back upstairs covered in sawdust.IMG_3360A view down the side of the house. Lots of brick dust on the path.

Sunday

IMG_3273

Today I removed the paper and masking from the en suite and did a few touch-ups. No doubt it will get messed up a bit during the fitting of the sanitary ware but I am happy for the moment and can do some minor repairs at the end. There is still a large hole to be bored into the wall where the extractor fan is going, so I anticipate more mess.

IMG_3276Shower. The paint edges are (fairly) straight but they look wavy in this picture because of the reflections on the chrome trim.

IMG_3274Until a few days ago when they were laid Mark didn’t realise the wavy tiles actually had a 3D surface. Those are real shadows on the tiles, not a printed pattern.

IMG_3283Rosie enjoying the cool floor. It continues to be very warm here.

IMG_3287Ruby planning an escape.

IMG_3280I haven’t painted the white on the windows, doors or trim. I did some stripping and sanding though so they are almost ready to go. I have read that you are meant to do the trim first but I didn’t have time – I really wanted the ceilings and walls painted before the en suite was fitted and I figured I could paint the windows later when I have the right equipment and have studied more YouTube videos on the correct technique.

IMG_3279One day soon I have a feeling that an entire room might actually be complete!

IMG_3278Rosie inspecting the shower tray.

IMG_3271

Things still to be done in the en suite:

  • Fitting of cabinets
  • Fitting of sanitary ware, basins and taps
  • Installation of shower screen, riser and taps
  • Fitting of mirrored cabinets
  • Fitting of radiator and heated towel rail
  • Painting of windows and trim
  • Fitting of spot lights and wall lights
  • Fitting of extractor fan
  • Installation of window film on glazing for privacy
  • Fitting of accessories such as a hand towel hook and toilet roll dispenser

And that’s it – a list with an actual end! At that point I can shop for new towels. I guess our dark grey towels will go with the scheme but the navy blue ones won’t do at all. Plus the grey ones have some bleach spots on  them…


Build Day #61

IMG_3241I began the day by going through the floorboards. Not an auspicious start! I was holding a full mug of tea at the time but managed to hold on to most of it.

IMG_3242When I first opened this tin of paint for the en suite it was a lurid fluorescent pinkish-purple and I panicked for a moment. After stirring it though, it turned the colour I was expecting. It is Farrow and Ball’s ‘Pelt’, a deep aubergine colour. It’s an Australian custom to stir paint with a wooden spoon (trust me!).

IMG_3243After the first coat it was clear that I would need to do a second one to gain full coverage. I had four hours to kill. Luckily it was a hot day (28 degrees) so the paint dried a little quicker than expected.

IMG_3258Meanwhile I began stripping the window sill of the main bathroom. At some point in the past all the woodwork was painted a light sage green. Let me repeat what I said yesterday – I do not like stripping paint. Plus there are so many layers of lead paint that I will probably end up with Painter’s Colic.

IMG_3251The cupboard doors have returned from their trip to the glazier and they now have glass in their little windows. Those square windows make me very happy – they must remind me of Play School. They need some handles next.

IMG_3252One day all of the various missing parts of the kitchen will arrive. It’s a very nice kitchen and I have a very nice kitchen supplier but there have already been about nine separate deliveries of components and we still don’t have everything we need. Oh well – at least that gave me the chance to change my mind on the size of the kitchen sink.

IMG_3255The ceiling roses were delivered today.

IMG_3254Rosie inspects the outer rings.

IMG_3259The second coat in the en suite went on like a dream and was very quick to do. It looks a warmer colour in this picture because of the afternoon light.

IMG_3250The cats stay in the flat on the top floor when I am painting. I can just imagine what they would do if they saw paint in those trays.